

Leaving space between necklace lengths and connecting them at the back with a layering clasp may help reduce tangling. Necklaces can knot when their lengths overlap and the chains move across each other. Different textures can also help keep the layers distinct.
If your necklaces twist together by midday, you’re not alone. A beautiful stack can be tricky to keep neat, but a few thoughtful choices make layering easier without losing the personal mix of pieces you love. The key is to manage the space between chains and how they move.
Learn how to choose necklace lengths, combine chain textures and use a layering clasp to help reduce tangling. You’ll also find simple ways to put on and store your necklaces, so your finished look feels polished and comfortable throughout the day.
Key Takeaways
- Begin with two or three necklaces, then add layers only if the stack still feels balanced.
- Pair delicate chains with heavier textures to balance their movement, and be mindful that very fine chains can knot more easily.
- Choose one statement pendant as the focal point so the layers feel considered rather than crowded.
- Keep necklaces fastened and stored separately between wears to help prevent knots and preserve their shine.
Mixing chain textures
Choose chains with contrasting textures and weights, then secure their clasps together with a layering clasp. These features help separate moving chains and keep a layered look more orderly.
-
Select Lightweight Chains with Varied Textures
Start with lightweight chains in different textures, such as a fine cable chain and a beaded chain. Their contrasting surfaces are easier to distinguish visually and can move differently against each other. Check that each chain lies smoothly when worn. Chains under 1 mm can be trickier to link and more prone to knotting, so handle them gently.
-
Choose Different Chain Weights
Mix a lighter chain with a sturdier one to balance movement. For example, pair a delicate chain with a solid-looking curb chain instead of two fine chains that may shift together. Check how they sit when you move, and avoid letting a heavier chain pull a delicate one out of place. Contrasting weights add definition without relying on identical chains.
-
Balance Chain and Pendant Weight
Match each pendant to a chain that suits its visual weight. A delicate diamond pendant can sit on a fine chain, while a heavier-looking pendant needs a chain that doesn’t seem overwhelmed by it. Try the pieces together and notice whether a pendant pulls its chain to one side. Keep one pendant as the focal point, then let simpler chains complement it.
-
Compare Pre-Layered and Separate Chains
Choose a pre-layered necklace for a coordinated set of chains designed to be worn together. Its main advantage is convenience: the lengths and textures come together as one composed look. Separate chains offer more freedom to mix jewellery you already own and adjust the combination. With either option, check that the clasps can connect at the back. A layering clasp links multiple necklaces and helps prevent twisting.
Why Do Layered Necklaces Tangle?
Chains tangle when they cross, slide over one another or bunch together while you wear them. Similar lengths, freely moving pendants and unfastened storage can make them cross more often.
- Use pendants and charms to create visual separation. Choose a pendant for one layer and a simpler chain for another, giving each piece a clear place in the stack. For example, let a small pendant sit above a longer charm rather than placing two bulky pendants at the same point. Different drops help distinguish the layers, though pendants alone can’t stop chains crossing.
- Pair a choker with a longer pendant necklace. A 14-inch choker, a foundation piece, and a 20-inch chain create a three-layer example with distinct drops. Place the pendant on the longer chain, leaving the choker clear. Check the layout from the front and sides; if the pendant catches on the shorter chain, adjust its position or choose a smoother charm.
- Balance pendants and charms before wearing the full stack. A large pendant can pull its chain down, while a light charm may shift when it brushes another layer. Keep one focal pendant and use simpler pieces around it. If two charms repeatedly catch, move one to a different length or leave it out of the combination. Mixing metals adds contrast, but spacing and movement still matter.
- Store each necklace separately after wearing. Fasten each clasp, then hang the chains on separate hooks or lay them apart on a jewellery stand. Keep pendants from resting across other chains to help avoid knots before the next wear. For a layered set, keep the arrangement only if the necklaces are secured together; otherwise, store them separately.
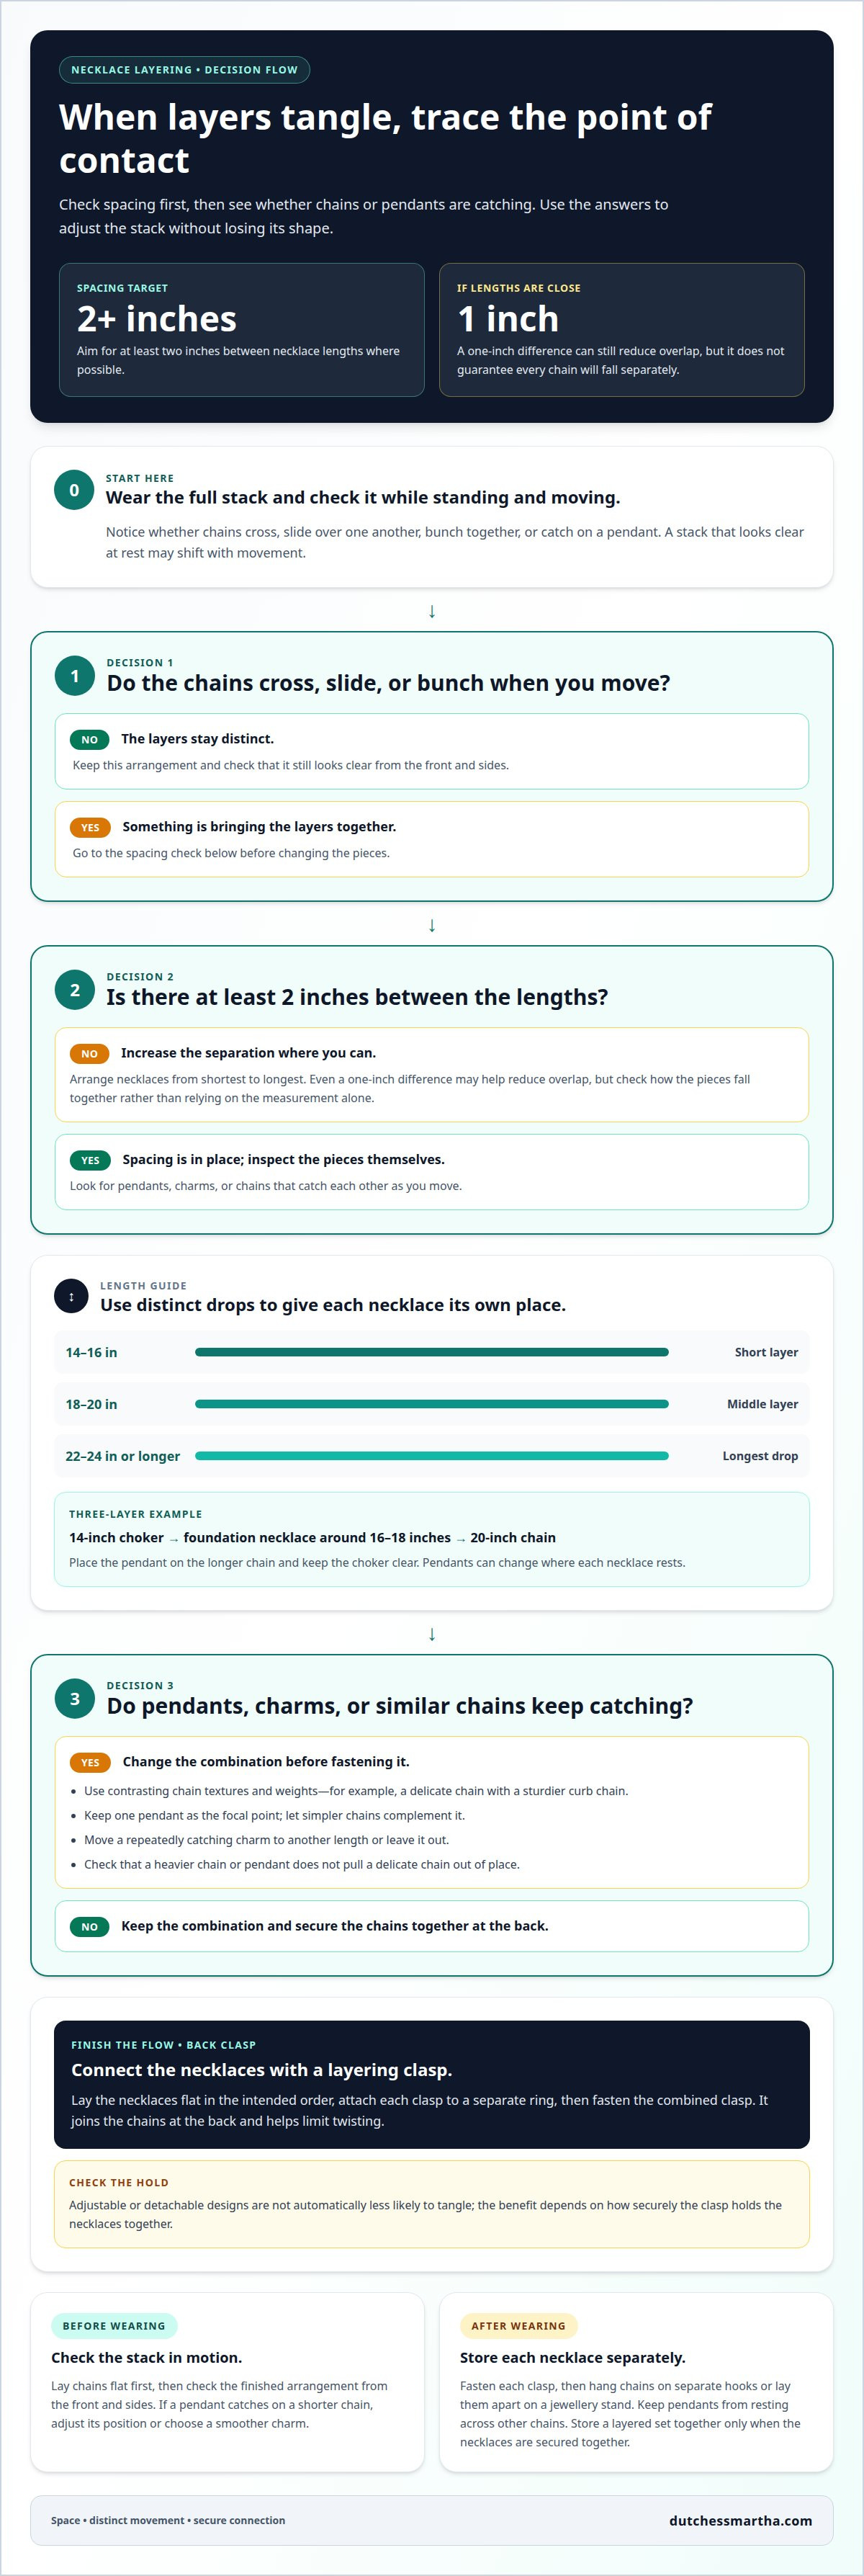
Leaving space between layers
Aim for at least two inches between necklace lengths. Clear gaps give each chain room to sit without crowding its neighbour.
- Measure each necklace from clasp to end, then arrange the lengths from shortest to longest. Leave at least two inches between layers where possible. If your current pieces differ by only one inch, that separation can still reduce overlap. Lay the chains flat first and check how they fall together before wearing them.
- Use length ranges to plan a balanced stack. A shorter layer can sit 14-16 inches from the neck, with an 18-20-inch necklace as the middle layer. Choose 22-24 inches or longer for the longest drop. These ranges create visible separation, but pendants may change where each necklace rests.
- Build a three-layer example with a 14-inch choker, a foundation necklace around 16-18 inches, and a 20-inch chain. Check the space between each pendant and the next chain. If two layers meet when you move, swap one necklace for a longer option. A clear gap helps the stack stay defined.
- Match the spacing to your outfit’s neckline. With an open button-down, a choker and a mid-length necklace can sit within the open collar. For a V-neck, choose a pointed stack or Y-shaped pendant that follows the neckline. With a crew neckline, longer chains can extend the look downward. Check the finished arrangement while standing and moving.
Treat a one-inch difference between close lengths as a useful adjustment, not a guarantee that every chain will fall separately. Try the pieces together, then look for places where a pendant or chain crosses another. If the stack still looks crowded, change the order or set aside a layer. The aim is to give each necklace a visible path, rather than force every piece into the same space.
Once the layers look clear at rest, check them again while standing and moving. Keep the arrangement that leaves each drop easy to distinguish, and adjust it if movement brings the pieces together. This makes spacing practical as well as visually balanced.
Layering clasp use to reduce tangling
A layering clasp joins necklace chains at the back and helps limit twisting. Adjustable or detachable designs aren’t automatically less likely to tangle; their benefit depends on how securely they hold the pieces together.
- Lay the necklaces flat before connecting them. Arrange each chain in the intended order, then attach each clasp to a separate ring on the layering clasp. This keeps the necklaces connected at the back instead of letting their individual clasps drift apart. Before fastening the combined clasp, check that none of the chains are twisted.
- Fasten the clasp and arrange the front chains. Put on the linked necklaces, then gently settle each pendant or chain across your neckline. A small ring or necklace separator can also hold the back ends together and help reduce crossing during the day. Check that the connector feels comfortable and doesn’t pull one necklace out of position.
- Choose an adjustable connector when you want to change each layer’s drop. Adjustability lets you reposition a chain, but won’t stop movement unless the necklaces are linked securely. A detachable design makes it easier to separate pieces for storage or wear. For a more controlled stack, reconnect every chain before putting it on.
- Practise the linking sequence before wearing your favourite combination. Once familiar, the necklace-linking technique takes about ten seconds. For example, connect a fine chain and a chunky necklace, check their front drops, then fasten the joined clasp. At bedtime, wear fewer layers or clasp them together to help reduce sleeping tangles. Explore layered jewellery looks for inspiration.
A 1-inch difference between necklace lengths can help reduce overlap, and putting the longest necklace on first can reduce crossovers. After clasping, take thirty seconds to adjust the necklace loops so each layer sits as intended. Before storing a layered necklace, fasten its clasp to help preserve the arrangement. These small steps complement a secure connector by keeping the chains aligned both while worn and when put away.
Dutchess Martha
Dutchess Martha offers jewellery and fashion accessories to help you create a layered look that reflects your personal style. Once you know which lengths, textures and clasp work for your stack, explore pieces that complement your wardrobe and favourite outfits. Pair your jewellery with women’s apparel for a considered everyday look, or browse homewares as you discover the style that feels like you. Choose pieces that suit your preferred layers, then use the spacing and fastening tips above to arrange them with care. Explore Dutchess Martha’s collection to find pieces for your look.
Make Your Layered Look Your Own
A necklace stack can become part of your personal style, changing with your outfit, mood and favourite pieces. Treat your layers as a flexible combination rather than a fixed formula. Keep the pairing that feels comfortable, then switch a chain or pendant for a fresh look. With a little experimenting, layered necklaces that don't tangle can feel effortless and distinctly yours.
Dutchess Martha brings together women’s apparel, fashion accessories and jewellery, making it easy to explore pieces that complement your look. If you’re ready to find inspiration for your next combination, contact Dutchess Martha for layering help. Your next favourite pairing can start with the jewellery you already love.
Frequently Asked Questions
How do layered necklace clasps and spacers work?
A spacer keeps necklace ends in a chosen arrangement at the nape, while a layering clasp gathers the fastenings into one closure. Choose a spacer if you want the chains to leave the back of your neck from separate points; choose a combined clasp for a single fastening motion. Either way, check that each chain hangs naturally and the connector doesn’t tug when you turn your head.
What necklace lengths are best for layering without tangling?
The best lengths create distinct drops on your neckline; there’s no set of numbers that suits everyone. Try the necklaces with the outfit you plan to wear, since a collar or neckline can change how the layers sit. Include the pendant in your check: its size and shape affect where the chain rests and whether it meets another layer.
Which materials and chain styles tangle least when layered?
No metal colour by itself prevents tangling. Choose chains that move comfortably together, and treat colour as a styling choice: 14k yellow, white and rose gold can be mixed for contrast. A useful test is to drape the pieces over your hand and shift them gently. If links catch or bunch during this small movement, choose a different pairing.
How can you layer separate necklaces to stop them tangling?
To help layered necklaces that don't tangle stay separate, test your combination with the planned outfit before wearing it for the day. Move naturally, then notice which pieces cross or catch. Change one necklace at a time so you can identify the cause. If a pendant keeps colliding with another piece, make it the focal point and simplify the surrounding layers.